Thursday, 31 December 2009

3 Wise Monkeys Pub on George


3 Wise Monkeys Pub on George Street, Sydney, NSW
Canon IXUS 50, F/4.9, 1/25 sec, 17.4 mm, ISO 50, 4:3, 13:44 31 December 2009
Image skewd, cropped, resized, sharpened, and level adjusted

Wednesday, 30 December 2009

Sydney Darling Harbour at night


Sydney Wildlife World & Sydney Aquarium
Leica D-LUX4, F/8.0, 1/500~1/30 sec, 5.1 mm, ISO 80, HDR, ±2EV, 16:9, 19:40 29 December 2009
Image skewd, cropped, resized, sharpened, and level changed


Historic Vessel
Leica D-LUX4, F/2.8, 1/60 sec, 12.8 mm, ISO 400, HDR, 16:9, 20:17 29 December 2009
Image skewd, cropped, resized, sharpened, and level adjusted


Pyrmont Bay Wharf
Leica D-LUX4, F/2.2, 1/80 sec, 6.8 mm, ISO 400, HDR, 4:3, 20:19 29 December 2009
Image skewd, cropped, resized, sharpened, and level adjusted


Darling Harbour Wharf & Sydney CBD
Leica D-LUX4, F/2.2, 1/100 sec, 6.8 mm, ISO 400, HDR, 16:9, 20:21 29 December 2009
Image skewd, cropped, resized, sharpened, and level adjusted


Sydney CBD & Sydney Tower
Leica D-LUX4, F/4.0, 1/8~8 sec, 8.8 mm, ISO 80, HDR, ±3EV, 16:9, 20:43 29 December 2009
Image skewd, cropped, resized, sharpened, and level adjusted


Historic Vessel & Sydney CBD
Leica D-LUX4, F/2.0, 5/8 sec, 5.1 mm, ISO 400, HDR, 16:9, 20:51 29 December 2009
Image skewd, cropped, resized, sharpened, and level adjusted

Monday, 14 December 2009

Upgraded to D-LUX 4 firmware Ver 2.1

Just upgraded the firmware of my Leica D-LUX 4 to the newly released version 2.1. According to the official release notes, "the exposure compensation and the auto bracket compensation can now be set up to ±3EV." This is a feature that I have been waiting for a long time.

Additionally, a standard "HIGH DYNAMIC" feature has been added to scene mode with this version.

Below are two HDR pictures testing the differences between ±1EV and ±3EV under the same low light condition and the same AWB setting, each directly generated from three auto-bracket shots by Photomatix Pro 3.2.6 using its default settings. No any other modifications.


Download the original
Leica D-LUX 4, F/2.0, 1/15 sec, 5.1 mm, ISO 80, Pattern Mode, ±1EV, 3:2, HDR, 21:22 14 December 2009


Download the original
Leica D-LUX 4, F/2.0, 1/15 sec, 5.1 mm, ISO 80, Pattern Mode, ±3EV, 3:2, HDR, 21:23 14 December 2009

Friday, 27 November 2009

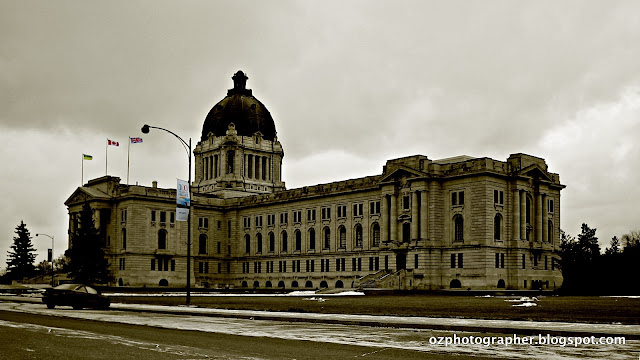
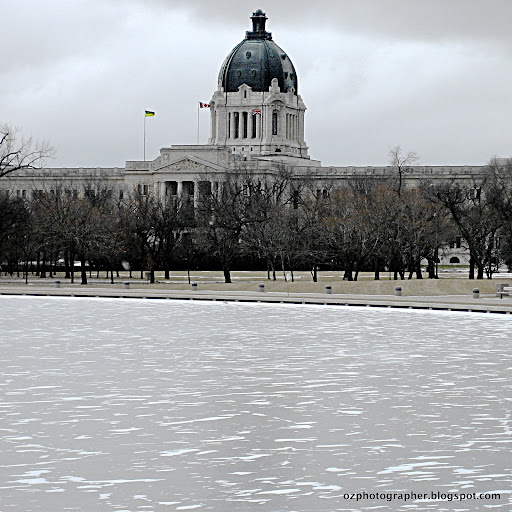
Historic building in winter


Saskatchewan Legislative Building, Regina, SK, Canada
Canon IXUS 50, F/2.8, 1/320 sec, 5.8 mm, ISO 50, Pattern Mode, +1/3, 4:3, 12:19 27 November 2005
Image skewd, cropped, resized, desaturated, and level adjusted


Saskatchewan Legislative Building, Regina, SK, Canada
Canon IXUS 50, F/4.9, 1/200 sec, 17.4 mm, ISO 50, Pattern Mode, 4:3, 12:13 27 November 2005
Image cropped, resized, desaturated, and level adjusted

Saturday, 14 November 2009

Sydney International Airport at night


Observation Deck View, Terminal 1, Sydney Kingsford International Airport
Leica D-LUX4, F/5.6, 5 sec, 5.1 mm, ISO 80, Pattern Mode, 3:2, 19:56 12 November 2009

Image skewd, cropped, resized, and level adjusted

Tuesday, 4 August 2009

Sydney Opera House at dawn


Sydney Opera House at dawn
Leica D-LUX4, F/5.0, 1/250 sec, 12.1 mm, ISO 80, Pattern Mode, HDR, ±3/3, 16:9, 06:56 18 July 2009

Tuesday, 21 July 2009

Leica D-LUX 4 Digital Zoom Test

Digital Zoom (DZ) is a bonus feature available on most consumer digital cameras. Some low-end digital cameras "rely entirely on digital zoom, lacking a real zoom lens, as on most camera phones."

Personally, I never ever preferred using digital zoom because of poor zooming quality with additional noise. As a result, I always turned it off on my cameras if the functionality was enabled by default.

Leica D-LUX 4, as a top-end consumer level compact camera, also supports digital zoom up to 10x based on its 2.5x optical zoom. Probably because Leica defined D-LUX4 a semi-professional camera, as the Son of M8, digital zoom is disabled by default in this camera.

However, for having a better understanding on my Leica D-LUX 4, I was still curious about its ability of digital zoom. Therefore, several test shots was taken in different occasions, as shown below. Just click to download the original JPEG images with no any processing applied.

At first, three shots taken from the same standing place, and from the optical wide-angle end to the digital telephoto end.


L1040327.JPG
Buildings at the south of Pyrmont Point Park, Pirrama Road, Pyrmont, NSW 2009
Leica D-LUX4, F/5.0, 1/500 sec, 5.1 mm (no zoom at the wide angle end)
ISO 80, Pattern Mode, 3:2, 15:00 19 July 2009


L1040328.JPG
An apartment close to Pyrmont Point Park, Harris Street, Pyrmont, NSW 2009
Leica D-LUX4, F/5.0, 1/400 sec, 12.8 mm (10x digital zoom)
ISO 80, Pattern Mode, 3:2, 15:00 19 July 2009


L1040329.JPG
The Nokia building close to Pyrmont Point Park, Harris Street, Pyrmont, NSW 2009
Leica D-LUX4, F/5.0, 1/400 sec, 12.8 mm (10x digital zoom)
ISO 80, Pattern Mode, 3:2, 15:05 19 July 2009

Not bad? See below for the corresponding cropped images in 100% pixel with no processing applied. The two scenes in 300×450 pixels (at left) have been digitally zoomed into 2520×3776 pixels (at right) with more visible details.

L1040327.JPG (Left) v.s. L1040328.JPG (Right)


L1040327.JPG (Left) v.s. L1040329.JPG (Right)

Secondly, two test shots of the top of Sydney Tower taken from the same standing point in different zoom ratios.


The Top of Sydney Tower - View within Hyde Park
Leica D-LUX4, F/4.5, 1/1000sec, 12.8 mm (8x digital zoom)
ISO 80, Pattern Mode, -1 step, 3:2, 08:30 18 July 2009


The Top of Sydney Tower - View within Hyde Park
Leica D-LUX4, F/4.5, 1/640sec, 12.8 mm (4x digital zoom)
ISO 80, Pattern Mode, -1 step, 3:2, 08:32 18 July 2009

All above shots were taken under bright daylight. How about indoor under varied lights? See the following test shots taken at a QVB cafe.


Jewels in the window of a jewelry shop at QVB
Leica D-LUX4, F/2.8, 1/125 sec, 12.8 mm (10x digital zoom)
ISO 100, Pattern Mode, 3:2, 08:50 18 July 2009


A girl working at the window of a jewelry shop at QVB
Leica D-LUX4, F/2.8, 1/125 sec, 12.8 mm (10x digital zoom)
ISO 200, Pattern Mode, 3:2, 08:50 18 July 2009


Two men chatting at a cafe in QVB
Leica D-LUX4, F/2.8, 1/60 sec, 12.8 mm (10x digital zoom)
ISO 400, Pattern Mode, 3:2, 08:51 18 July 2009

You can see the zooming quality and image noise goes bad, significantly, when the lighting condition becomes worse. Nevertheless, the camera's digital zoom works very well in certain lighting conditions, at least much more better than my expectation compared with other digital cameras I ever used.

As a result, for me, I have enabled Digital Zoom on my Leica D-LUX 4 in P/A/S/M modes. However, C1 and C2 modes still keep using optical zoom, ISO 80 and RAW as they are for serious photography.

Sunday, 19 July 2009

Leica D-LUX 4 vs Panasonic DMC-LX3 Test Side by Side

I got a chance to compare Leica D-LUX 4 and Panasonic DMC-LX3 side by side by shooting the exact same scene indoor under the exact same fluorescent light. Three film effects were tested for each camera. Only Fine JPEG pictures were produced. No RAW pictures.

I have to say, for the JPEG pictures shot under such light, there is no significant difference in image quality and colour fidelity between the two sister cameras.

The two cameras were:

Leica D-LUX 4 - Firmware v1.2, purchased from Australia in January 2009
Panasonic DMC-LX3 - Firmware v1.2, purchased from the UK in October 2008

The settings were:

Exposure Mode: Aperture Priority
Metering Mode: Pattern
ISO: 80
White Balance: AWB
Exposure: 1/4 sec
Aperture: 2.0
Focal Length: 5.1mm
Flash Used: No
Ratio: 3:2
Flash Used: No

All the images below were generated by the camera directly. No any modifications. You may click to download the original images (3776×2520 pixels).


Standard Film: Leica D-LUX 4 (Left) vs Panasonic DMC-LX3 (Right)


Dynamic Film: Leica D-LUX 4 (Left) vs Panasonic DMC-LX3 (Right)


Dynamic B/W Film: Leica D-LUX 4 (Left) vs Panasonic DMC-LX3 (Right)


UPDATE: You may notice one fact after downloading all the original JPEG files of the test shots: the Leica JPEG file is always a bit smaller than the Panasonic one, at least in this test.

Friday, 3 July 2009

HDR daylight test images

I took three groups of AEB shots using my Leica D-LUX 4 when I walked over an small church and a TV tower in Artarmon at about 10am this morning. It was a fine sunny morning with very good clear visibility and a nice blue sky, so I reckoned that was a good time to test daylight photos for HDR (High Dynamic Range imaging).

All the test photos were taken using A mode (Aperture Priority), AWB (Auto White Balance), Multi-segment Metering, Multi-zone AF, and Auto Bracket from -1 to +1 EV in 3 stops.

Tonight I generated the HDR images from the above pictures to see how HDR daylight images look like. Here we are, click to download the images in original size.


Leica D-LUX4, F/8.0, 1/100 sec, 5.1 mm, ISO 80, Pattern Mode, ±3/3, 3:2, 09:38 3 July 2009


Artarmon Chatswood South Uniting Church, Artarmon, NSW
Leica D-LUX4, F/8.0, 1/100 sec, 5.1 mm, ISO 80, HDR, ±3/3, 3:2, 09:38 3 July 2009


Leica D-LUX4, F/8.0, 1/125 sec, 12.8 mm, ISO 80, Pattern Mode, ±3/3, 3:2, 09:42 3 July 2009
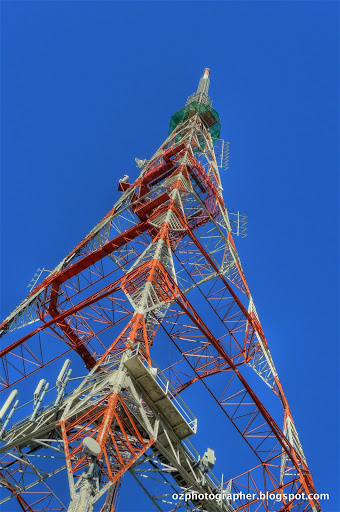

A transmission tower for Seven, Nine and Ten Networks,
operated by TXA in Hampden Road, Artarmon, NSW (Northwest View)
Leica D-LUX4, F/8.0, 1/125 sec, 12.8 mm, ISO 80, HDR, ±3/3, 3:2, 09:42 3 July 2009


Leica D-LUX4, F/8.0, 1/125 sec, 12.8 mm, ISO 80, Pattern Mode, ±3/3, 3:2, 09:42 3 July 2009


A transmission tower for Seven, Nine and Ten Networks,
operated by TXA in Hampden Road, Artarmon, NSW (Northeast View)
Leica D-LUX4, F/8.0, 1/200 sec, 12.8 mm, ISO 80, Pattern Mode, ±3/3, 3:2, 09:45 3 July 2009

The HDR software used for this test is Photomatix Pro 3.1. Here are the settings used for generating the three HDR images. Additionally, all images were sharpened using its built-in utility. No other effects applied.

Settings of Generate HDR

Align source images: By matching features
Don't crop: No
Reduce chromatic aberrations: Yes
Reduce noise: Yes
Attempt to reduce ghosting artifacts: No
Take tone curve of color profile: Yes (recommended)

Settings of Tone Mapping

Detail Enhancer - Strength: 70
Detail Enhancer - Color Saturation: 70
Detail Enhancer - Luminosity: 0
Detail Enhancer - Light Smoothing: High
Detail Enhancer - Microcontrast: 0
Detail Enhancer - Tone Settings - White Point: 0.1
Detail Enhancer - Tone Settings - Black Point: 0.1
Detail Enhancer - Tone Settings - Gamma: 1
Detail Enhancer - Color Settings - Temperature: 0
Detail Enhancer - Color Settings - Saturation Highlights: 0
Detail Enhancer - Color Settings - Saturation Shadows: 0
Detail Enhancer - Smoothing Settings - Micro-smoothing: 0
Detail Enhancer - Smoothing Settings - Highlights Smoothing: 0
Detail Enhancer - Smoothing Settings - Shadows Smoothing: 0
Detail Enhancer - Smoothing Settings - Shadows Clipping: 0
Tone Compressor: All default settings

It is quite obvious that HDR images are impressive compared with their original photos. They correctly represent the blue sky and the subject details at the same time, with the lovely shadow and greens. It shows HDR should be beneficial for sunny daylight photography as well, especially for representing building shadows and highlight details.

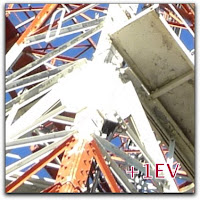
For example, the following images clearly demonstrate the differences of the highlight details in HDR and their original exposures. Click to view the images in 100% size.


However, for the details in dark in a HDR image, such as the walls and the waste bag in shadow in the church image, noise is still obviously noticeable even under ISO 80. Click to see the partial image in 100% at right. Nevertheless, it is better than nothing compared with the dark block in that shoot of "correct" exposure without bias.

Finally, I did a little enhancement to the first HDR church picture in Picasa 3, straightened, a bit more shadows and highlights added, and a bit more light filled to the whole image, in turn to make the little church look more lovely. Please bear with the waste bag and the black tree top at right, this is a test image only. :-))

Additionally, please notice the tree top at right, it shows obvious halos along the edge compared to the original images. That's a well-known problem for HDR images especially for the silhouette areas.


Artarmon Chatswood South Uniting Church, Artarmon, NSW
Leica D-LUX4, F/8.0, 1/100 sec, 5.1 mm, ISO 80, HDR, ±3/3, 3:2, 09:38 3 July 2009

Tuesday, 30 June 2009

Shiretoko National Park

I am learning HDR recently. These are my first two HDR pictures generated from 6 AEB pictures I shot in an early morning in Hokkaido, Japan, by using Photomatix Pro 3.1, the most popular photography software for creating High Dynamic Range photos easier.

HDR stands for High Dynamic Range imaging, "is a set of techniques that allows a greater dynamic range of luminances between light and dark areas of a scene than normal digital imaging techniques. The intention of HDRI is to accurately represent the wide range of intensity levels found in real scenes ranging from direct sunlight to shadows."

AEB stands for Auto Exposure Bracketing, an automatic exposure feature available on some more advanced cameras, which allows the camera to take several successive shots with different exposure combinations. Initially, in the age of film photography, this technique was mainly for obtaining the most correct exposure, especially with chrome film because of its small exposure tolerance compared with negative film. Nowadays, in the era of digital photography, it can also be considered as a convenient method to shoot pictures for High Dynamic Range imaging.


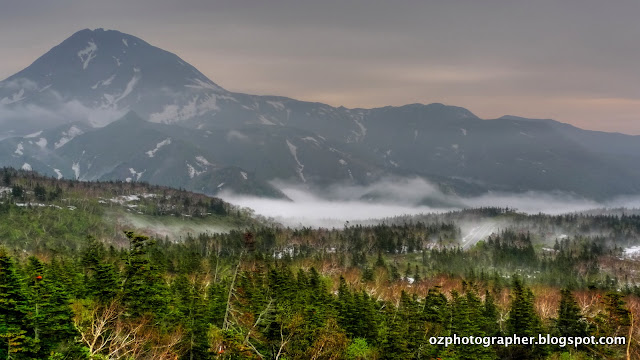
Shiretoko National Park/Shiretoko-odan Road, Shari, Hokkaido, Japan
日本の北海道東部斜里郡、知床国立公園 / 知床横断道路
Leica D-LUX4, F/8.0, 1/60 sec, 7.9 mm, ISO 80, Pattern Mode, ±1/3, 16:9, 04:46 7 June 2009


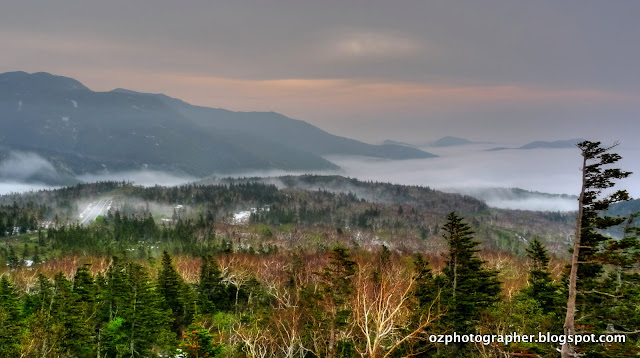
Shiretoko National Park/Shiretoko-odan Road, Shari, Hokkaido, Japan
日本の北海道東部斜里郡、知床国立公園 / 知床横断道路
Leica D-LUX4, F/8.0, 1/100 sec, 7.9 mm, ISO 80, Pattern Mode, ±1/3, 16:9, 04:46 7 June 2009