Like most digital cameras, Leica D-LUX 4 supports Auto Review after every shot. There are five options for Auto Review available in the SETUP menu: "OFF", "1 SEC", "2 SEC", "HOLD", and "ZOOM". By default, it is set to 2 Seconds.
The "HOLD" option allows you to continue viewing the new shot until you press the shutter release or other buttons to get ready for the next shot. This is good for serious photographers who may spend a bit more time to evaluate each shot and make changes accordingly. I had used this option for a while and found it was quite convenient.
But I recently found an issue of Auto Review which caused me to disable this feature at all.
The issue is: while Auto Review is working on HOLD, the aperture is on hold, too. That means, the lens does not return to full open aperture after shutter fired until Auto Review stops showing the last shot. The issue also applies to the other options of Auto Review, of course, except the "OFF" one, though the duration is less than 2 seconds with these options.
This is really not good for the lens, one of the most expensive parts of the camera. The aperture of this lens should be better at the wide open position while not at work. The aperture is fully opened when the camera is power off.
As it is not necessary to keep the aperture working while reviewing a photograph because the shooting procedure has finished, I speculate this is a defect of D-LUX 4 firmware, which is inherent from the LUMIX firmware of Panasonic DMC-LX3.
However, the conclusion is just to turn OFF the Auto Review, at all.
Simply pressing the "▼/Fn" button* lets you review the last shot instantly, even for a long time with no worries about the aperture as it is no longer working in this stage. There is one more advantage after disabling the Auto Review, you may continue to shoot without any pause, if required, therefore you won't lose any chance to capture a decisive moment.
* The "▼/Fn" button can be customised for other purposes. Make sure the "Fn BUTTON SET" option in SETUP menu has been assigned to "REVIEW" (the default setting) before disabling the Auto Review.
Saturday, 24 April 2010
Tuesday, 20 April 2010
Leica V-LUX 20 announced
After the rumours lasted for about two weeks, the Leica V-LUX 20 was officially announced today at Leica's web site, just a few hours ago.
I checked the website this afternoon, the new camera was not listed there at that time.
Like the relationship between Leica D-LUX 4 and Panasonic DMC-LX3, the V-LUX 20 is a near-identical twin of the Panasonic ZS7/TZ10, but with a more expensive price tag of US $699/£495 GBP. But according to dpreview.com, the camera can only shoot 720p HD video in a less sophisticated Motion JPEG format than the Panasonic's AVCHD Lite format.
The camera looks like C-LUX 3 if you see it in the front, and looks like D-LUX 4 on the back. I don't know why Leica named this camera by prefixing with a "V", probably just because of its super-zoom lens (LEICA DC-VARIO-ELMAR 4.1-49.2mm), which is similar to the one (LEICA DC VARIO-ELMARIT 1:2.8-3.7/7.4-88.8 ASPH) equipped on V-LUX 1.


Leica V-LUX 20 - front and back view


Leica C-LUX3 - front view and Leica D-LUX 4 - back view
Moreover, this is the first Leica camera to feature GPS tagging. As per what I know about its sister, DMC-TZ10, this functionality can be active even the camera is off. I am not sure if it is battery consuming in reality. Another interesting thing is, at the end of the press release from dpreview.com, they say the "GPS tagging may not function in China and neighbouring regions". I don't know why, very strange.
Lastly, as the new camera still has its Panasonic lineage inside, I believe it also has a Service Mode as that of D-LUX 4. I will verify this later.
I checked the website this afternoon, the new camera was not listed there at that time.
Like the relationship between Leica D-LUX 4 and Panasonic DMC-LX3, the V-LUX 20 is a near-identical twin of the Panasonic ZS7/TZ10, but with a more expensive price tag of US $699/£495 GBP. But according to dpreview.com, the camera can only shoot 720p HD video in a less sophisticated Motion JPEG format than the Panasonic's AVCHD Lite format.
The camera looks like C-LUX 3 if you see it in the front, and looks like D-LUX 4 on the back. I don't know why Leica named this camera by prefixing with a "V", probably just because of its super-zoom lens (LEICA DC-VARIO-ELMAR 4.1-49.2mm), which is similar to the one (LEICA DC VARIO-ELMARIT 1:2.8-3.7/7.4-88.8 ASPH) equipped on V-LUX 1.


Leica V-LUX 20 - front and back view


Leica C-LUX3 - front view and Leica D-LUX 4 - back view
Moreover, this is the first Leica camera to feature GPS tagging. As per what I know about its sister, DMC-TZ10, this functionality can be active even the camera is off. I am not sure if it is battery consuming in reality. Another interesting thing is, at the end of the press release from dpreview.com, they say the "GPS tagging may not function in China and neighbouring regions". I don't know why, very strange.
Lastly, as the new camera still has its Panasonic lineage inside, I believe it also has a Service Mode as that of D-LUX 4. I will verify this later.
Sunday, 18 April 2010
Leica D-LUX 4 Service Mode
As we know, Leica D-LUX 4 is a re-badged version of Panasonic LUMIX DMC-LX3, equipped with a Leica/Panasonic jointly designed lens and several key technologies solely from Panasonic such as MEGA O.I.S. (Optical Image Stabilizer) and Venus Engine IV. The firmware of Leica D-LUX 4 is actually developed by Panasonic too, though it is officially released by Leica Camera AG. Therefore, D-LUX 4 does have a special Panasonic Service Mode with its firmware, like that of DMC-LX3 and all other Panasonic LUMIX cameras.
I found this mode from reading some forum posts in Chinese talking about how to reset the firmware language of Panasonic LUMIX cameras including LX3. They named this special mode "工程模式" in Chinese, literally "Engineering Mode" or "Factory Mode" in English. After googling the related online discussions, I think the correct term should be "Service Mode" in English.
As far as I explored, the Service Mode may allow you to do some kinds of operations which are normally not available in the camera's menu:
(1) Reset the camera to unboxing settings. (Not only to the factory default settings)
(2) Reset the firmware region for supporting more languages, if applicable.
(3) Check camera usage information.
(4) Maintain the system ROM.
Let's see how to enter the D-LUX 4 Service Mode:
1. Turn off the camera.
2. Switch to RECORD mode [].
3. Set the mode dial to [P].
4. Press and hold the ▲/± button (Up arrow, above the central MENU/SET button) and the FOCUS button (on the top, beside the shutter) simultaneously.
5. Turn on the camera while holding the two buttons.

 You are now temporarily in the Service Mode. You can confirm your status by checking the SETUP menu. There is one more option named "ROM BACKUP" there, next to the "VERSION DISP." option, as shown at right.
The camera may return from this mode to the normal mode by turning the power off and on again. After the power cycling operation, the extra "ROM BACKUP" option will no longer be available in the SETUP menu.
So what can you do once you are in this temporary Service Mode?
According to the menu options shown under "ROM BACKUP", you may create a backup of system ROM to the SD card ("DSC▶SD"), or restore a version of system ROM and user settings from the SD card ("SDALL▶DSC" and "SDUSER▶DSC"). The "DSC" here should stand for "Digital Still Camera", as a general term used in Panasonic cameras.
Once your press MENU/SET button on the "DSC▶SD" option, the camera will be busy for a few seconds with an animated sandglass showing on the screen. After that, two text files will be generated on your SD card, named "EEPROM00.TXT" (22,587 bytes) and "EEPROM01.TXT" (89,407 bytes). Each file contains a brief header and the hexadecimal dump list of a data block. According to my experience, I don't think they are firmware dump or any kind of executable code, probably just user settings and camera parameters.
There are two options for "SDALL▶DSC" operation, one is "ID CHECK", the other is "FORCE". I did NOT try the two options on my camera. I guess, "ID CHECK" means the camera will verify an ID string or checksum before uploading a code file into the camera. In contrast, the "FORCE" option should just upload a new code file straight away regardless the brand, model and checksum. Probably, someone could use this "FORCE" option to transform a DMC-LX3 to a cute D-LUX 4??
The last option under "ROM BACKUP" menu is "!▶LUMIX". I guess it means "Quit to LUMIX". This LUMIX option can be an evidence to show its Panasonic origin. Moreover, the option was probably named by a UNIX-loving programmer who was used to some old software such as VI for years. I tried this option and it seemed the camera did nothing except blinking the red LED in the front (Self timer indicator/AF focus assist lamp).
Anything else interesting under the Service Mode?
Yes, you may check the usage information of your camera. At first, make sure you are in the Service Mode, then follow the steps below to see the secret of your camera.
1. Press and hold the FOCUS button, then MENU/SET and ◀/⎋ (Left arrow) buttons together. The camera now shows a screen of zeros on a white background. If you press the DISPLAY button, the camera will cycle through three different content showing some kind of parameter codes in decimal or hexadecimal form, as illustrated below. The arrow buttons can be used here to scroll through the code arrays.
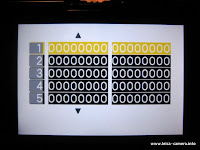
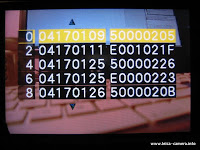
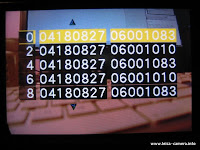
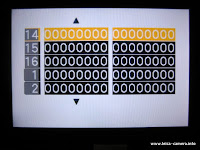
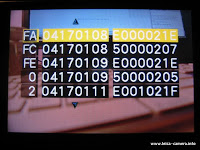
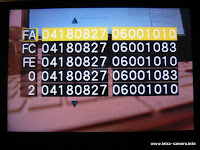
(Guy Parsons, a Sydney based LX3 owner, considered the first "Zero" screen above was an Error Code Log used for Panasonic service persons, and the explanation should be in their Service Manual. He also revealed some of the counters below.)
2. Again, press and hold the FOCUS button, then MENU/SET and ◀/⎋ (Left arrow) buttons together. The camera will show its usage information in two pages, as shown blow. Press the DISPLAY button to switch between the pages, and press the ◀ and ▶ buttons (Left and Right arrows) to scroll the view horizontally.
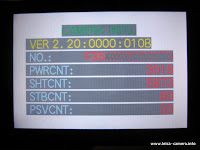
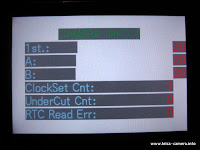
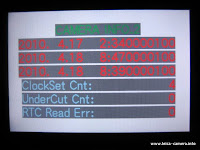
The camera information is interpreted below:
VER 2.20:0000:010B -> Firmware version is 2.20. Region code is 010B. (Australia?)
NO.: F35XXXXXXXXXX -> A 12-digit number with a "F" prefix. (Motherboard serial number?)
PWRCNT: 3018 -> Power On Count, the number of times camera turned on.
SHTCNT: 5873 -> Shutter Count, the number of times shutter fired.
STBCNT: 80 -> Strobe Count, the number of times flash fired.
PSVCNT: 33 -> Power Saving Count, the number of times auto power off has actuated.
1ST.: 2010.4.17 2:340000100 -> Date and time of first clock set. (Using folder "100LEICA"?)
A: 2010.4.18 8:470000100 -> Date and time of last two clock sets.
B: 2010.4.18 8:390000100 -> (See above)
ClockSet Cnt: 4 -> Clock Set Count, the number of times camera clock changed.
UnderCut Cnt: 0 -> Under-Cut Count.
RTC Read Err: 0 -> Real-time clock read error count, the number of read errors of RTC.
3. Press the same button combination again, the camera will return to the normal display.
As for the operation (1) and (2) mentioned early in the purpose of Service Mode, the camera needs to enter the Service Mode permanently in order to completely reset the camera.
The steps to enter LUMIX Service Mode permanently:
1. Turn off the camera.
2. Switch to RECORD mode [].
3. Set the mode dial to [P].
4. Press and hold the ▲/± button (Up arrow, above the central MENU/SET button) and the FOCUS button (on the top, beside the shutter) simultaneously.
5. Turn on the camera while holding the two buttons.
6. Switch to PLAYBACK mode [►] while still holding the two buttons.
7. Release the two buttons.
8. Press and hold the ▲/± button (Up arrow) and the FOCUS button simultaneously, again.
9. After hearing a beep, switch back to RECORD mode [►] while holding the two buttons
10. Release the two buttons.
 Now you are in the permanent Service Mode. Instead of the red Leica logo, a yellow triangle with an exclamation mark inside will appear when you turn off the camera, as shown at right. According to Wiórek, the yellow triangle appears when the firmware is not set to any of specific regional models.
The camera will NOT return from the permanent Service Mode to the normal mode by turning the power off and on again. You are still in the Service Mode after you turn on the camera. You have to initialise the camera to get the lovely Leica logo back. Please be aware that this procedure will reset all customised settings you made on the camera and erases all photos stored in internal camera memory. You have to proceed through all steps below very carefully, and take your own risk.
Here are the steps to initialise the camera to its unboxing status, and to reset the camera region. This is a Hard Reset compared to the Soft Reset available in the SETUP menu. Make sure the camera is on and in the permanent Service Mode before the initialisation.
1. Switch to RECORD mode [].
2. Press and hold the ▶/⚡ button (Right arrow) and the central MENU/SET button simultaneously.
3. Turn off the camera while holding the two buttons. The INITIAL SETTINGS screen will appear, as illustrated below left. Here, "AUSB" is the region code for Australia. I am not sure why it is ending with "B".
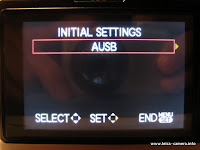
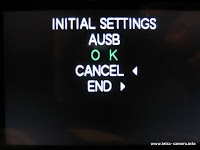
4. Use ▲ and ▼ buttons (Up and Down arrows) to change your preferred region. Press ▶ button (Right arrow) to choose the region code. Press MENU/SET button to cancel. NOTE: In the illustrated screen above left, there is only one region (AUSB) available for my D-LUX 4 as there is no hidden regions for the Australian market. According to some articles (1/2/3/4), the region codes for LUMIX cameras may be NONE (Japan), EG/EGM/EB/GN, GC (Hong Kong), GD (Korea), GK (Mainland China) and PP (North America).
 5. At the second INITIAL SETTINGS screen shown above right, press ▶ button (Right arrow) to confirm your choice of region code. Press ◀ button (Left arrow) to re-choose the region. Please be aware that the camera keeps beeping in this step until you press the ◀ or ▶ button (Left or Right arrow). The camera will be off after initialising the settings and showing the lovely Leica logo at the end, as shown at right.
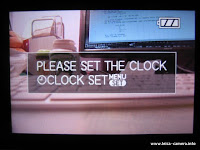
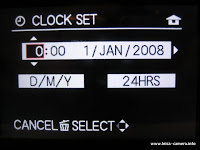
6. Turn on the camera. The following two screens will appear asking you to set the camera clock. Just follow the instruction on the LCD to finish that, as what you did when you first turned on your D-LUX 4. (As I mentioned above, this moment of first clock set will be recorded in the Camera Information, and will not be removed except by a hard reset)
OK, that's what I know about the D-LUX 4 Service Mode, so far.
Please note, all the above procedures should be exactly applicable to Panasonic LUMIX DMC-LX3, too, except not seeing the red dot logo while turning off the camera. :-)) Moreover, I believe that most procedures here will be also applicable to other Panasonic LUMIX cameras and their Leica versions (C-LUX/D-LUX/V-LUX series) as well. In some cases, if there is no FOCUS button on your LUMIX camera, just try other individual buttons (on the top) instead, such as E.ZOOM or DISPLAY button.
According to what I googled as of today, this article should be the most comprehensive guide regarding the LUMIX Service Mode. Just hope it could help.
I found this mode from reading some forum posts in Chinese talking about how to reset the firmware language of Panasonic LUMIX cameras including LX3. They named this special mode "工程模式" in Chinese, literally "Engineering Mode" or "Factory Mode" in English. After googling the related online discussions, I think the correct term should be "Service Mode" in English.
As far as I explored, the Service Mode may allow you to do some kinds of operations which are normally not available in the camera's menu:
(1) Reset the camera to unboxing settings. (Not only to the factory default settings)
(2) Reset the firmware region for supporting more languages, if applicable.
(3) Check camera usage information.
(4) Maintain the system ROM.
Let's see how to enter the D-LUX 4 Service Mode:
1. Turn off the camera.
2. Switch to RECORD mode [].
3. Set the mode dial to [P].
4. Press and hold the ▲/± button (Up arrow, above the central MENU/SET button) and the FOCUS button (on the top, beside the shutter) simultaneously.
5. Turn on the camera while holding the two buttons.
The camera may return from this mode to the normal mode by turning the power off and on again. After the power cycling operation, the extra "ROM BACKUP" option will no longer be available in the SETUP menu.
So what can you do once you are in this temporary Service Mode?
According to the menu options shown under "ROM BACKUP", you may create a backup of system ROM to the SD card ("DSC▶SD"), or restore a version of system ROM and user settings from the SD card ("SDALL▶DSC" and "SDUSER▶DSC"). The "DSC" here should stand for "Digital Still Camera", as a general term used in Panasonic cameras.
Once your press MENU/SET button on the "DSC▶SD" option, the camera will be busy for a few seconds with an animated sandglass showing on the screen. After that, two text files will be generated on your SD card, named "EEPROM00.TXT" (22,587 bytes) and "EEPROM01.TXT" (89,407 bytes). Each file contains a brief header and the hexadecimal dump list of a data block. According to my experience, I don't think they are firmware dump or any kind of executable code, probably just user settings and camera parameters.
There are two options for "SDALL▶DSC" operation, one is "ID CHECK", the other is "FORCE". I did NOT try the two options on my camera. I guess, "ID CHECK" means the camera will verify an ID string or checksum before uploading a code file into the camera. In contrast, the "FORCE" option should just upload a new code file straight away regardless the brand, model and checksum. Probably, someone could use this "FORCE" option to transform a DMC-LX3 to a cute D-LUX 4??
The last option under "ROM BACKUP" menu is "!▶LUMIX". I guess it means "Quit to LUMIX". This LUMIX option can be an evidence to show its Panasonic origin. Moreover, the option was probably named by a UNIX-loving programmer who was used to some old software such as VI for years. I tried this option and it seemed the camera did nothing except blinking the red LED in the front (Self timer indicator/AF focus assist lamp).
Anything else interesting under the Service Mode?
Yes, you may check the usage information of your camera. At first, make sure you are in the Service Mode, then follow the steps below to see the secret of your camera.
1. Press and hold the FOCUS button, then MENU/SET and ◀/⎋ (Left arrow) buttons together. The camera now shows a screen of zeros on a white background. If you press the DISPLAY button, the camera will cycle through three different content showing some kind of parameter codes in decimal or hexadecimal form, as illustrated below. The arrow buttons can be used here to scroll through the code arrays.
(Guy Parsons, a Sydney based LX3 owner, considered the first "Zero" screen above was an Error Code Log used for Panasonic service persons, and the explanation should be in their Service Manual. He also revealed some of the counters below.)
2. Again, press and hold the FOCUS button, then MENU/SET and ◀/⎋ (Left arrow) buttons together. The camera will show its usage information in two pages, as shown blow. Press the DISPLAY button to switch between the pages, and press the ◀ and ▶ buttons (Left and Right arrows) to scroll the view horizontally.
The camera information is interpreted below:
VER 2.20:0000:010B -> Firmware version is 2.20. Region code is 010B. (Australia?)
NO.: F35XXXXXXXXXX -> A 12-digit number with a "F" prefix. (Motherboard serial number?)
PWRCNT: 3018 -> Power On Count, the number of times camera turned on.
SHTCNT: 5873 -> Shutter Count, the number of times shutter fired.
STBCNT: 80 -> Strobe Count, the number of times flash fired.
PSVCNT: 33 -> Power Saving Count, the number of times auto power off has actuated.
1ST.: 2010.4.17 2:340000100 -> Date and time of first clock set. (Using folder "100LEICA"?)
A: 2010.4.18 8:470000100 -> Date and time of last two clock sets.
B: 2010.4.18 8:390000100 -> (See above)
ClockSet Cnt: 4 -> Clock Set Count, the number of times camera clock changed.
UnderCut Cnt: 0 -> Under-Cut Count.
RTC Read Err: 0 -> Real-time clock read error count, the number of read errors of RTC.
3. Press the same button combination again, the camera will return to the normal display.
As for the operation (1) and (2) mentioned early in the purpose of Service Mode, the camera needs to enter the Service Mode permanently in order to completely reset the camera.
The steps to enter LUMIX Service Mode permanently:
1. Turn off the camera.
2. Switch to RECORD mode [].
3. Set the mode dial to [P].
4. Press and hold the ▲/± button (Up arrow, above the central MENU/SET button) and the FOCUS button (on the top, beside the shutter) simultaneously.
5. Turn on the camera while holding the two buttons.
6. Switch to PLAYBACK mode [►] while still holding the two buttons.
7. Release the two buttons.
8. Press and hold the ▲/± button (Up arrow) and the FOCUS button simultaneously, again.
9. After hearing a beep, switch back to RECORD mode [►] while holding the two buttons
10. Release the two buttons.
The camera will NOT return from the permanent Service Mode to the normal mode by turning the power off and on again. You are still in the Service Mode after you turn on the camera. You have to initialise the camera to get the lovely Leica logo back. Please be aware that this procedure will reset all customised settings you made on the camera and erases all photos stored in internal camera memory. You have to proceed through all steps below very carefully, and take your own risk.
Here are the steps to initialise the camera to its unboxing status, and to reset the camera region. This is a Hard Reset compared to the Soft Reset available in the SETUP menu. Make sure the camera is on and in the permanent Service Mode before the initialisation.
1. Switch to RECORD mode [].
2. Press and hold the ▶/⚡ button (Right arrow) and the central MENU/SET button simultaneously.
3. Turn off the camera while holding the two buttons. The INITIAL SETTINGS screen will appear, as illustrated below left. Here, "AUSB" is the region code for Australia. I am not sure why it is ending with "B".
4. Use ▲ and ▼ buttons (Up and Down arrows) to change your preferred region. Press ▶ button (Right arrow) to choose the region code. Press MENU/SET button to cancel. NOTE: In the illustrated screen above left, there is only one region (AUSB) available for my D-LUX 4 as there is no hidden regions for the Australian market. According to some articles (1/2/3/4), the region codes for LUMIX cameras may be NONE (Japan), EG/EGM/EB/GN, GC (Hong Kong), GD (Korea), GK (Mainland China) and PP (North America).
6. Turn on the camera. The following two screens will appear asking you to set the camera clock. Just follow the instruction on the LCD to finish that, as what you did when you first turned on your D-LUX 4. (As I mentioned above, this moment of first clock set will be recorded in the Camera Information, and will not be removed except by a hard reset)
OK, that's what I know about the D-LUX 4 Service Mode, so far.
Please note, all the above procedures should be exactly applicable to Panasonic LUMIX DMC-LX3, too, except not seeing the red dot logo while turning off the camera. :-)) Moreover, I believe that most procedures here will be also applicable to other Panasonic LUMIX cameras and their Leica versions (C-LUX/D-LUX/V-LUX series) as well. In some cases, if there is no FOCUS button on your LUMIX camera, just try other individual buttons (on the top) instead, such as E.ZOOM or DISPLAY button.
According to what I googled as of today, this article should be the most comprehensive guide regarding the LUMIX Service Mode. Just hope it could help.
Wednesday, 14 April 2010
Sydney city at dawn in winter


Sydney CBD at dawn in winter, Australia
Leica D-LUX4, F/5.0, 1/15~1/60 sec, 12.8 mm, ISO 80, Pattern Mode, HDR, ±3/3, 16:9, 06:51 18 July 2009
Image skewed, cropped, level changed, curves adjusted, and sharpened
Sunday, 14 March 2010
Different views to Opera House
The park chair in a historic stone archway against Opera House, Milsons Point, NSW
Leica D-LUX4, F/3.5, 1/400 sec, 5.1 mm, ISO 400, HDR, 4:3, 14:31 13 March 2010
Just under Harbour Bridge, Milsons Point, NSW
Leica D-LUX4, F/5.0, 1/1000 sec, 7.4 mm, ISO 400, HDR, 4:3, 14:40 13 March 2010
The Olympic Drive under Harbour Bridge, Milsons Point, NSW
Leica D-LUX4, F/5.0, 1/1000 sec, 12.8 mm, ISO 400, HDR, 4:3, 14:41 13 March 2010
The Kirribilli Wharf against Opera House, Kirribilli, NSW
Leica D-LUX4, F/5.0, 1/1000 sec, 12.8 mm, ISO 400, HDR, 4:3, 14:49 13 March 2010
The stone bricks beside the Kirribilli Wharf against Opera House, Kirribilli, NSW
Leica D-LUX4, F/4.5, 1/1000 sec, 5.4 mm, ISO 400, HDR, 4:3, 14:56 13 March 2010
The stone at the coast against Opera House, Kirribilli, NSW
Leica D-LUX4, F/4.5, 1/1000 sec, 5.4 mm, ISO 400, HDR, 4:3, 15:07 13 March 2010
A cruise ship passing Opera House, Kirribilli, NSW
Leica D-LUX4, F/5.6, 1/1000 sec, 12.8 mm, ISO 400, HDR, 4:3, 15:09 13 March 2010
The stone at the coast against Opera House, Kirribilli, NSW
Leica D-LUX4, F/5.0, 1/800 sec, 5.4 mm, ISO 400, HDR, 4:3, 15:12 13 March 2010
The shells on the stone against Opera House, Kirribilli, NSW
Leica D-LUX4, F/5.0, 1/800 sec, 5.4 mm, ISO 400, HDR, 4:3, 15:14 13 March 2010
A boat passing Opera House, Kirribilli, NSW
Leica D-LUX4, F/5.6, 1/1000 sec, 12.8 mm, ISO 400, HDR, 4:3, 15:22 13 March 2010
The unit buildings on Waruda Street against Opera House, Kirribilli, NSW
Leica D-LUX4, F/4.0, 1/1000 sec, 5.1 mm, ISO 400, HDR, 4:3, 15:23 13 March 2010
A boat cruising on Sydney Harbour, Kirribilli, NSW
Leica D-LUX4, F/4.0, 1/1000 sec, 12.8 mm, ISO 400, HDR, 4:3, 15:24 13 March 2010
A boat cruising on Sydney Harbour, Kirribilli, NSW
Leica D-LUX4, F/5.0, 1/1000 sec, 12.8 mm, ISO 400, HDR, 4:3, 15:24 13 March 2010
The boats in Sydney Harbour, Kirribilli, NSW
Leica D-LUX4, F/4.0, 1/1000 sec, 12.8 mm, ISO 400, HDR, 16:9, 15:28 13 March 2010
The unit buildings on Waruda Street against Opera House, Kirribilli, NSW
Leica D-LUX4, F/4.5, 1/1000 sec, 5.1 mm, ISO 400, HDR, 4:3, 15:29 13 March 2010
The Chair outside Beulah Street Wharf against Opera House, Kirribilli, NSW
Leica D-LUX4, F/4.0, 1/640 sec, 5.1 mm, ISO 400, HDR, 16:9, 15:32 13 March 2010
The Chair in Beulah Street Wharf against Opera House, Kirribilli, NSW
Leica D-LUX4, F/4.0, 1/500 sec, 7.9 mm, ISO 400, HDR, 4:3, 15:36 13 March 2010
A boat cruising on Sydney Harbour, Kirribilli, NSW
Leica D-LUX4, F/5.6, 1/800 sec, 5.1 mm, ISO 400, HDR, 16:9, 15:37 13 March 2010
Flowers on the waterfront of Sydney Harbour, Kirribilli, NSW
Leica D-LUX4, F/6.3, 1/1000 sec, 5.1 mm, ISO 400, HDR, 4:3, 15:41 13 March 2010
Flowers on the waterfront of Sydney Harbour, Kirribilli, NSW
Leica D-LUX4, F/5.0, 1/1000 sec, 5.1 mm, ISO 400, HDR, 4:3, 15:44 13 March 2010
Sunday, 3 January 2010
Test shots of Leica D-LUX4 1:1 aspect ratio
Boys playing in front of the pillars of ANZ Stadium, NSW
Leica D-LUX4, F/2.2, 1/5 sec, 6.3 mm, ISO 400, 1:1, Dynamic B&W, 16:09 3 January 2010
Leica D-LUX4, F/2.2, 1/40 sec, 6.3 mm, ISO 320, 1:1, Dynamic B&W, 16:09 3 January 2010
Download the original

Leica D-LUX4, F/2.2, 1/40 sec, 6.3 mm, ISO 320, 1:1, Dynamic B&W, 16:09 3 January 2010
Download the original
Saturday, 2 January 2010
Boys playing in front of ANZ Stadium

Boys playing in front of the pillars of ANZ Stadium, NSW
Leica D-LUX4, F/2.8, 1/4 sec, 12.8 mm, ISO 400, 4 x Digital Zoom, 16:9, 22:57 2 January 2010
Image resized and level adjusted

Boys playing in front of the pillars of ANZ Stadium, NSW
Leica D-LUX4, F/2.8, 1/4 sec, 12.8 mm, ISO 400, 4 x Digital Zoom, 16:9, 22:58 2 January 2010
Image resized and level adjusted
Subscribe to:
Comments (Atom)


